DIY - Sparkling Night Necklace
The stunning, silver grained Kashmiri beads make a huge statement against sleek black accent beads in this gorgeous necklace. Crystal rounds add a touch of extra sparkle throughout, satisfying the need for some extra "bling".
"Little black dress" inspired, this necklace is sure to please and add the final touch to any outfit. This wonderful piece uses a simple stringing technique, with braided strands. A breeze for the beginner beader who has some experience with crimping tubes.

MATERIALS:
- 1 Toggle Clasp
- 2 Silver Plated Jump Rings
- 2 Silver Plated Headpins (each 2" long)
- 2 Sterling Silver End Caps or Bead Caps
- 2 Hole Silver Spacer Bar with Swarovski Crystals
- 2 or 3 Hole Silver Spacer Bar with Swarovski Crystals
- Flexible Silver Beading Wire (such as Tiger tail)
- 18 Crimp Tubes
- 11/0 Opaque Black Delicas (A)
- 3mm Glass Barrel Shaped Beads in Black (B)
- 3mm Glass Faceted Clear Crystal Rounds (C)
- 6mm Glass Faceted Bicones in Black (D)
- 6mm Glass Faceted Clear Crystal Rounds (E)
- 9 Maruti Kashmiri Beads Studded with Silver Grains (F) - MBD-348
TOOLS:
- Wire Cutters
- Crimp Pliers
- Round Nose Pliers
- Tape Measure or Ruler
Step 1 (no image): Cut six strands of beading wire, each 30 inches long.
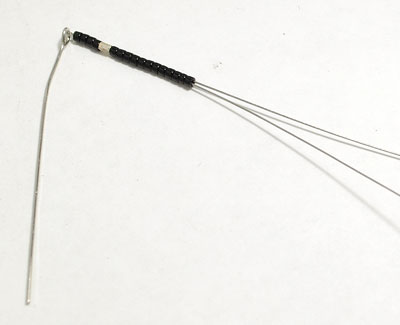
Step 2a (Strand 1):
Loop the wire around the headpin. String 4A, 1 crimp tube, and 12A: going back through the beads with the tail. Pull tight leaving a 4.5 inch tail. Crimp the tube. You will start each of the following strands in this similar fashion.
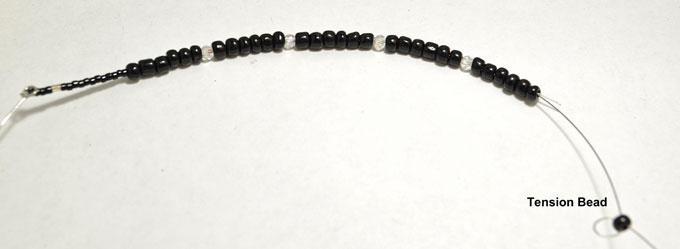
Step 2b (Strand 1 - above image): Continue stringing (using the working end and tail as one strand): 6B, 1C, 6B, 1C, 6B, 1C, 6B, 1C, and 6B. Put a tension bead at the end of this set.
Step 3a (Strand 2 - no image): Secure to the headpin with 4A, 1 crimp tube, and 5A. Pull tight and leave a 4.5 inch tail. Crimp the tube.

Step 3b (Strand 2 - above image): Continue stringing: 6B, 1C, 6B, 1C, 6B, 1C, 6B, 1C, 6B, 1C, and 3B. This strand will now share the same tension bead as Strand 1.
Step 4a (Strand 3 - no image): Secure to the headpin with 4A, 1 crimp tube, and 10A. Pull tight and leave a 4.5 inch tail. Crimp the tube.

Step 4b (Strand 3 - above image): Continue stringing: 6B, 1C, 6B, 1C, 6B, 1C, 6B, 1C, 6B, 1C, 3B. Put a new tension bead at the end of this set.
Step 5a (Strand 4 - no image): Secure to the headpin with 4A, 1 crimp tube, and 4A. Pull tight and leave a 4.5 inch tail. Crimp the tube.
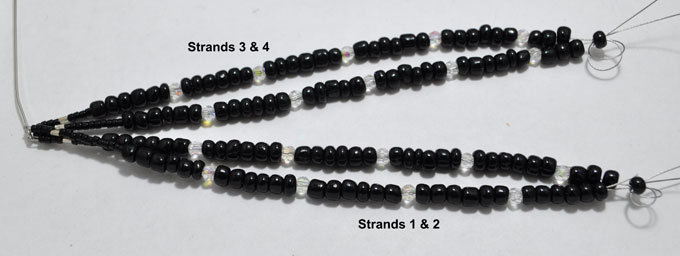
Step 5b (Strand 4 - above image): Continue stringing: 6B, 1C, 6B, 1C, 6B, 1C, 6B, 1C, 6B, 1C, and 3B. This strand will now share the same tension bead as Strand 3.
Step 6a (Strand 5 - no image): Secure to the headpin with 4A, 1 crimp tube, and 10A. Pull tight and leave a 4.5 inch tail. Crimp the tube.
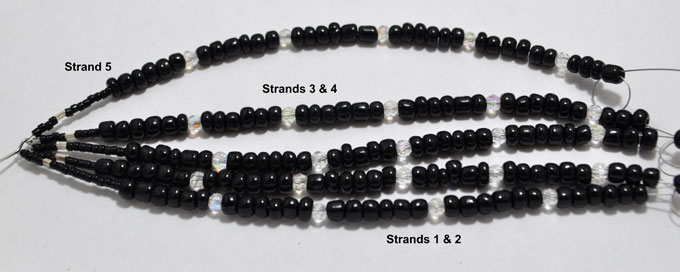
Step 6b (Strand 5 - above image): Continue stringing: 6B, 1C, 6B, 1C, 6B, 1C, 6B, 1C, 6B, 1C, 3B. Put a new tension bead at the end of this set.
Step 7a (Strand 6 - no image): Secure to the headpin with 4A, 1 crimp tube, and 6A. Pull tight and leave a 4.5 inch tail. Crimp the tube.
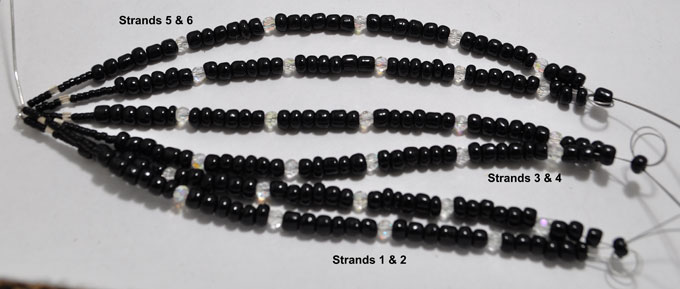
Step 7b (Strand 6 - above image): Continue stringing: 6B, 1C, 6B, 1C, 6B, 1C, 6B, 1C, 6B, 1C, and 3B. This strand will now share the same tension bead as Strand 5. Tip: Make sure that you are including the tail with each strand so that they won’t need to be woven in later. Trim any excess wire from the tails.
Step 8a (no image): Take the tension bead off of Strand 1 & 2. Make sure that they both are the same length, and make adjustments (adding or removing beads) as necessary. (Note any adjustments for future reference.) Take one crimp bead and crimp the two strands together.
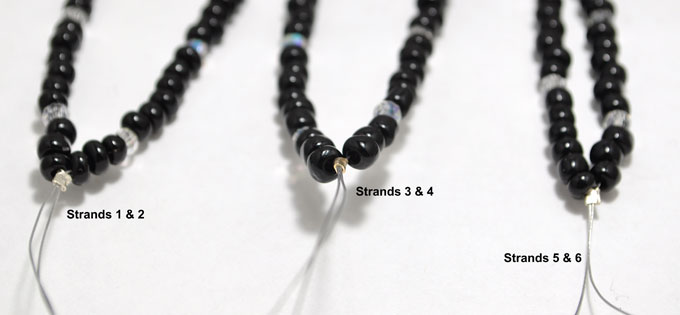
Step 8b (above image): Crimp together, respectively, Strands 3 & 4 and Strands 5 & 6. Tip: Make sure all of the strands are close to equal length. If you are working with more uniform beads you should have no problem. The beads used here are not uniform, so the lengths had to be adjusted.

Step 9 (above image): Fan out the strands so they are in order from 1 - 6. Keeping the strands as straight as possible, start your braid. (Each double strand counts as one strand.) When finished, tape the end of the braid, so that it will not unravel.
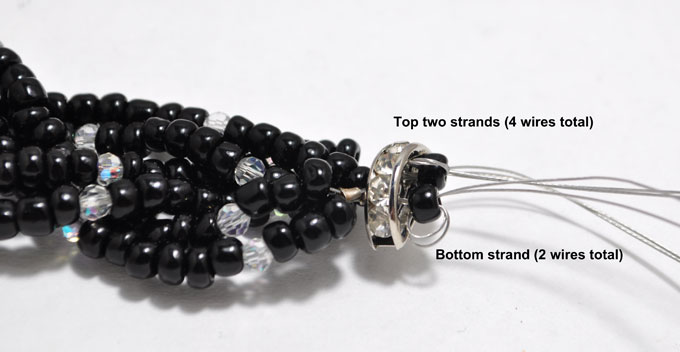
Step 10 (above image): String both of the “double strands” (located at the top of the braid) through the top hole in your 2-hole spacer bar. Put a tension bead on these two strands. String the last “double strand” through the bottom hole in the spacer bar. Put a tension bead on this strand as well. Tip: For the middle portion of this necklace, each double strand will be treated as one strand. They will be separated again later in the piece.
Step 11a (Top Strand - no image): Remove the tension bead on the top. Separate the two crimped pieces and take the strand closest to the top (remember this is actually two wires crimped together). Put the tension bead on the other strand below it.
Step 11b (Top Strand - no image): String: 1A, 2B, 1D, 1F, 1D, 3B, 1E, 2B, and 1A. Go through the top hole in one of the 3-hole spacer bars.
Step 11c (Top Strand - no image): Continue stringing: 1A, 2B, 1D, 1F, 1D, 3B, 1E, 3B, 1E, 2B, and 1A. Got through the top hole in the last 3-hole spacer bar.
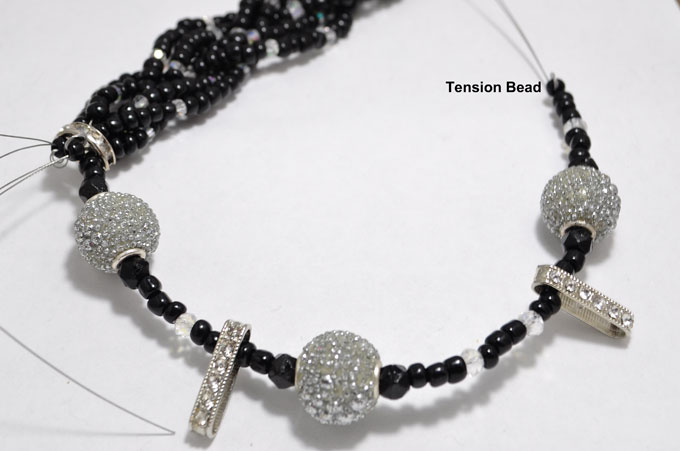
Step 11d (Top Strand - above image): Continue stringing: 1A, 2B, 1D, 1F, 1D, 3B, 1E, 3B, and 1A. Put a tension bead on this strand.
Step 12a (Middle Strand - no image): Remove the tension bead from the previous strand (which was sharing the tension bead with the top strand).
Step 12b (Middle Strand - no image): String: 1A, 2B, 1E, 3B, 1E, 3B, 1D, 1F, 1D, 1B, and 1A. Go through the middle hole in the first 3-hole spacer bar.
Step 12c (Middle Strand - no image): Continue stringing: 1A, 2B, 1E, 3B, 1E, 3B, 1E, 3B, 1D, 1F, 1D, 2B, and 1A. Go through the middle hole in the second 3-hole spacer bar.
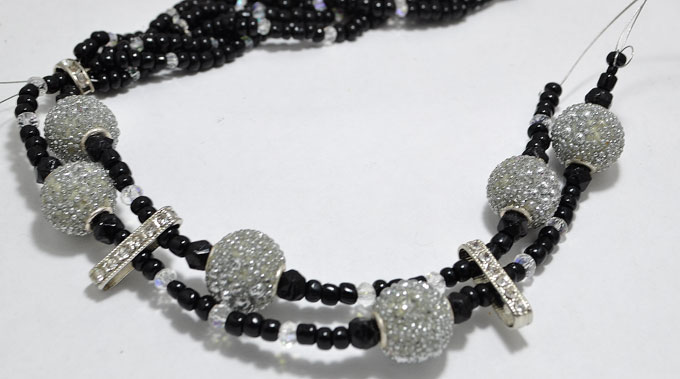
Step 12d (Middle Strand - above image): Continue stringing: 1A, 2B, 1E, 3B, 1E, 3B, 1D, 1F, 1D, 1B, and 1A. Put a tension bead on this strand.
Step 13a (Bottom Strand - no image): Remove the tension bead from the last strand.
Step 13b (Bottom Strand - no image): String: 1A, 3B, 1E, 3B, 1D, 1F, 1D, 3B, 1E, 3B, and 1A. Go through the bottom hole in the first 3-hole spacer bar.
Step 13c (Bottom Strand - no image): Continue stringing: 1A, 3B, 1E, 3B, 1D, 1F, 1D, 3B, 1E, 3B, and 1A. Go through the bottom hole in the second 3-hole spacer bar.
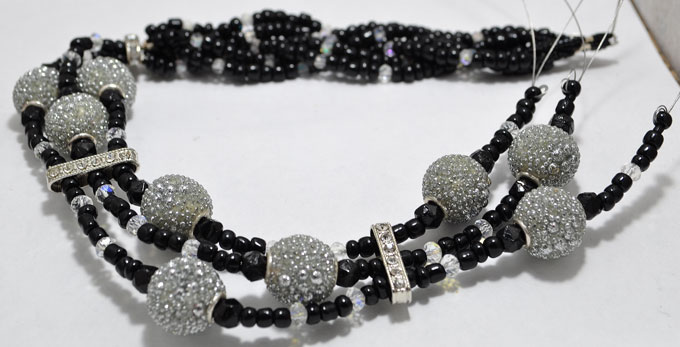
Step 13d (Bottom Strand - above image): Continue stringing: 1A, 3B, 1E, 3B, 1D, 1F, 1D, 3B, 1E, 3B, and 1A. Put a tension bead on this strand.
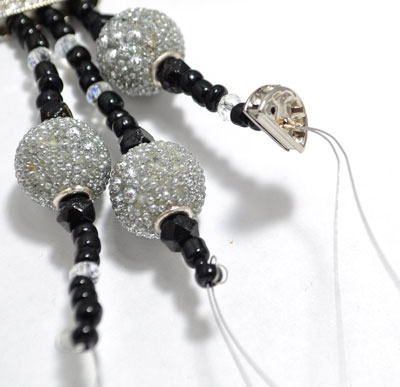
Step 14:
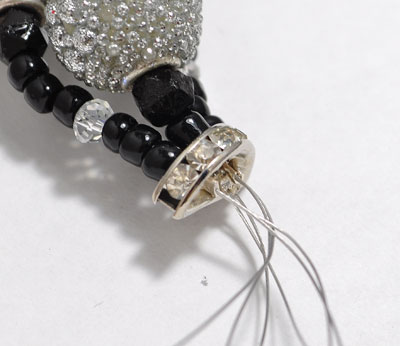
Remove the tension bead on the top strand. Add the second 2-hole spacer bar, stringing this strand through the top hole. Add a crimp tube to this strand. Pull as tight as you can (without damaging the beadwork) and crimp.
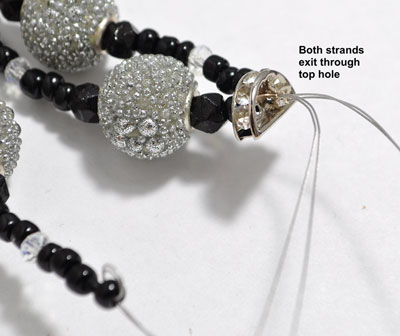
Step 15:
Remove the tension bead on the middle strand. Go through the top hole of the same 2-hole spacer bar. Add a crimp tube, pull tight and crimp.
Step 16:
For the third strand, remove the tension bead, and go through the bottom hole of the same 2-hole spacer. Add a crimp tube, pull tight and crimp.
Step 17 (no image): Now we will begin separating all of the strands. Try to keep them separated in the order that they are coming out of the 2-hole spacer bar. Take into account the changes you made earlier, if any. Each strand is a mirror of the strand on the opposite site of the necklace. Strand 1 starts with the top-most strand.

Step 18 (above image): Strand 1 (Strand 6 in reverse): String 3B, 1C, 6B, 1C, 6B, 1C, 6B, 1C, 6B, 1C, 6B, 6A, 1 crimp tube, and 4A. Put on a tension bead.
Step 19 (no image): Strand 2 (Strand 5 in reverse): String 3B, 1C, 6B, 1C, 6B, 1C, 6B, 1C, 6B, 1C, 6B, 8A, 1 crimp tube, and 4A. This strand shares the same tension bead as Strand 1.
Step 20 (no image): Strand 3 (Strand 4 in reverse): String 3B, 1C, 6B, 1C, 6B, 1C, 6B, 1C, 6B, 1C, 6B, 4A, 1 crimp tube, and 4A. Put on a tension bead.
Step 21 (no image): Strand 4 (Strand 3 in reverse): String 3B, 1C, 6B, 1C, 6B, 1C, 6B, 1C, 6B, 1C, 6B, 10A, 1 crimp tube, and 4A. This strand shares the same tension bead as Strand 3.
Step 22 (no image): Strand 5 (Strand 2 in reverse): String 3B, 1C, 6B, 1C, 6B, 1C, 6B, 1C, 6B, 1C, 6B, 5A, 1 crimp tube, and 4A. Put on a tension bead.
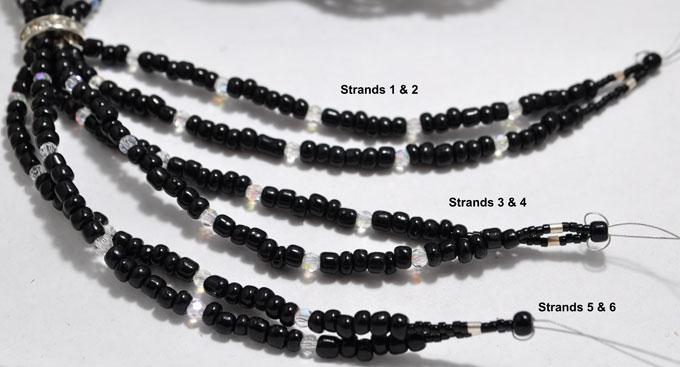
Step 23 (above image): Strand 6 (Strand 1 in reverse): String 3B, 1C, 6B, 1C, 6B, 1C, 6B, 1C, 6B, 1C, 6B, 12A, 1 crimp tube, and 4A. This strand shares the same tension bead as Strand 5.
Step 24:
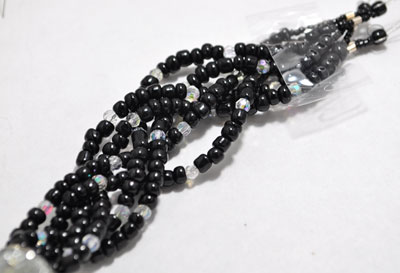
Strand 6 (Strand 1 in reverse): String 3B, 1C, 6B, 1C, 6B, 1C, 6B, 1C, 6B, 1C, 6B, 12A, 1 crimp tube, and 4A. This strand shares the same tension bead as Strand 5.
Step 25:
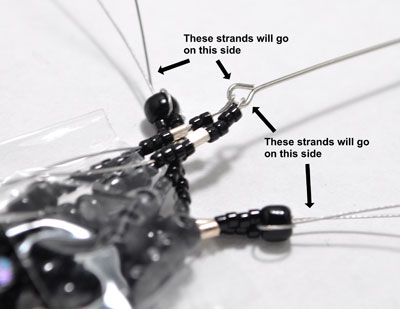
Loop the wire around the headpin. String 4A, 1 crimp tube, and 12A: going back through the beads with the tail. Pull tight leaving a 4.5 inch tail. Crimp the tube. You will start each of the following strands in this similar fashion.
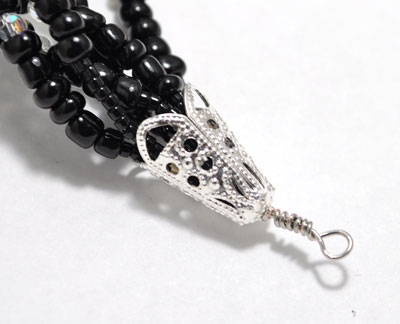
Step 26:
Slide the bead cap over the headpin. Make a loop at 3/8". Wrap the excess around the headpin.
Step 27 (no image): Attach a jump ring and one side of the clasp. Repeat for the other side of the necklace.
